Quick Answer:
Real estate photos should follow the natural flow of the home. Start with the front exterior and common areas—living room, kitchen, dining room—then move to bedrooms and bathrooms. End with the backyard and outbuildings, unless they contain a selling feature like an inground pool. Buyers stay engaged when photos match how they would tour the home in person.
What Order Should Real Estate Photos Be In?
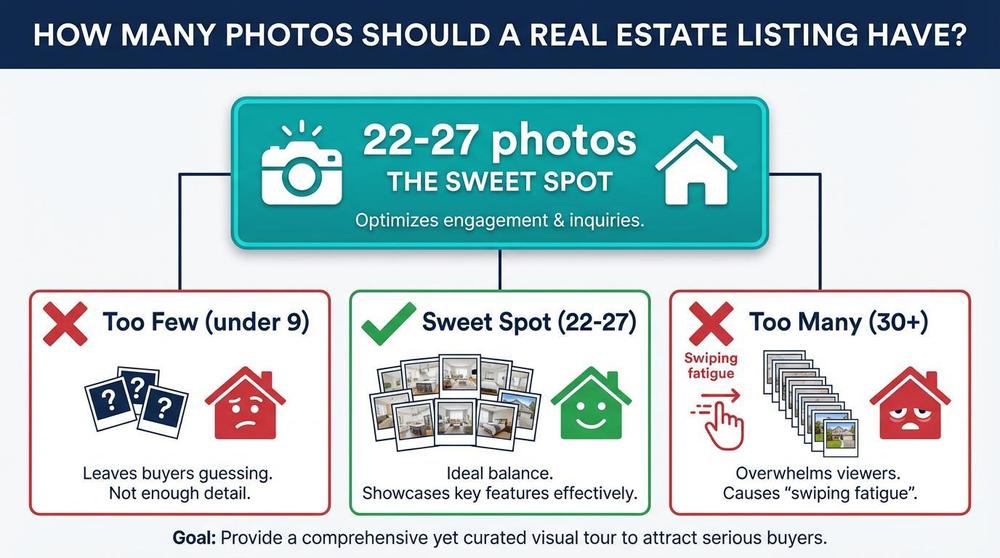
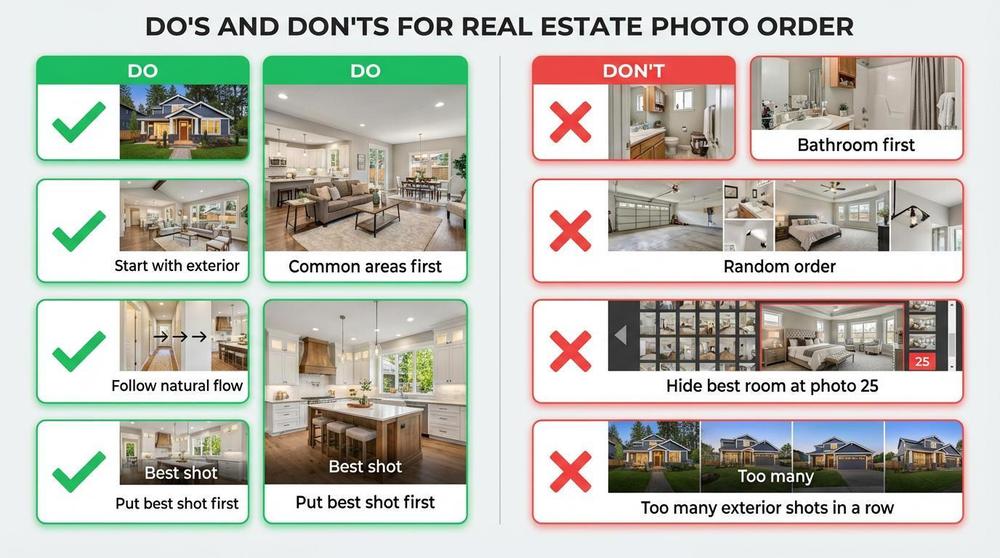
Start with the front exterior and common areas. The living room, kitchen, and dining room should come early. After that, move to bedrooms and bathrooms. End with the backyard and outbuildings—unless the backyard has a selling feature like an inground pool, in which case show it earlier. Aim for 22–27 photos and order them like this. This order mirrors a real walk-through and keeps buyers scrolling.
Why does order matter? Buyers decide in seconds whether to keep looking. A logical flow feels natural. A random order feels confusing and can cause them to leave.
Why Start with Common Areas?
Common Areas Sell the Home
The living room, kitchen, and dining room are where people spend most of their time. Buyers imagine cooking, eating, and relaxing there. Showing these first hooks them.
Benefits of leading with common areas:
- Buyers see the best spaces right away
- The flow feels like a real tour
- Interest stays high from the start
- Weak rooms don’t kill the mood early
The Natural Flow Rule
Most photographers shoot with the flow of the home. They enter like a buyer would. They move from room to room in a path that makes sense. Your photo order should do the same.
Think of it like a story. You don’t start with the bathroom. You start with the front door and the main living spaces.
The Best Photo Order for Listings
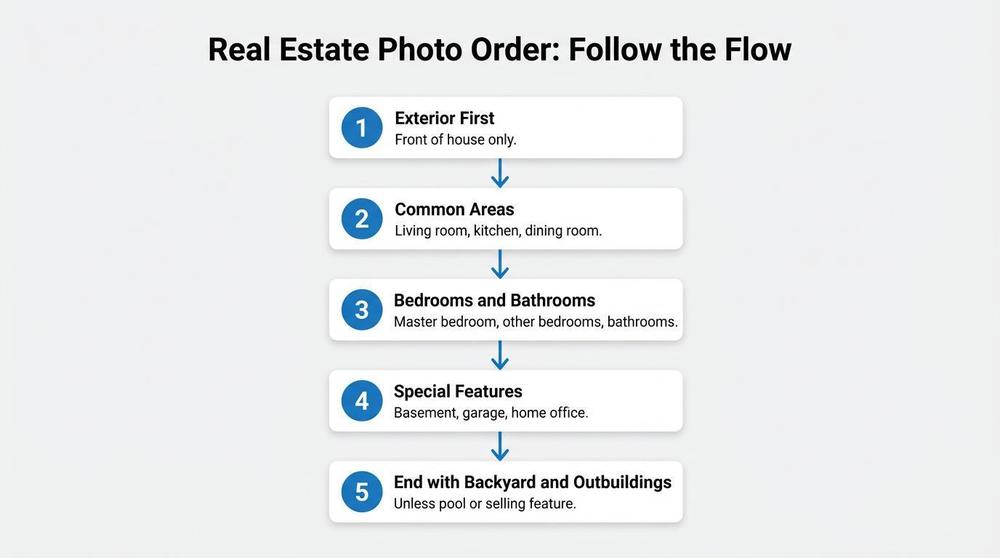
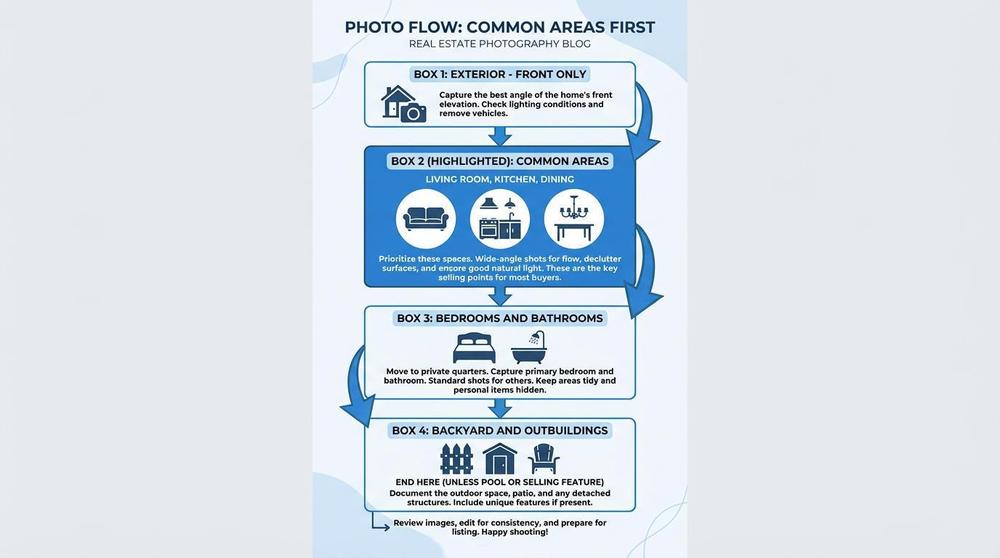
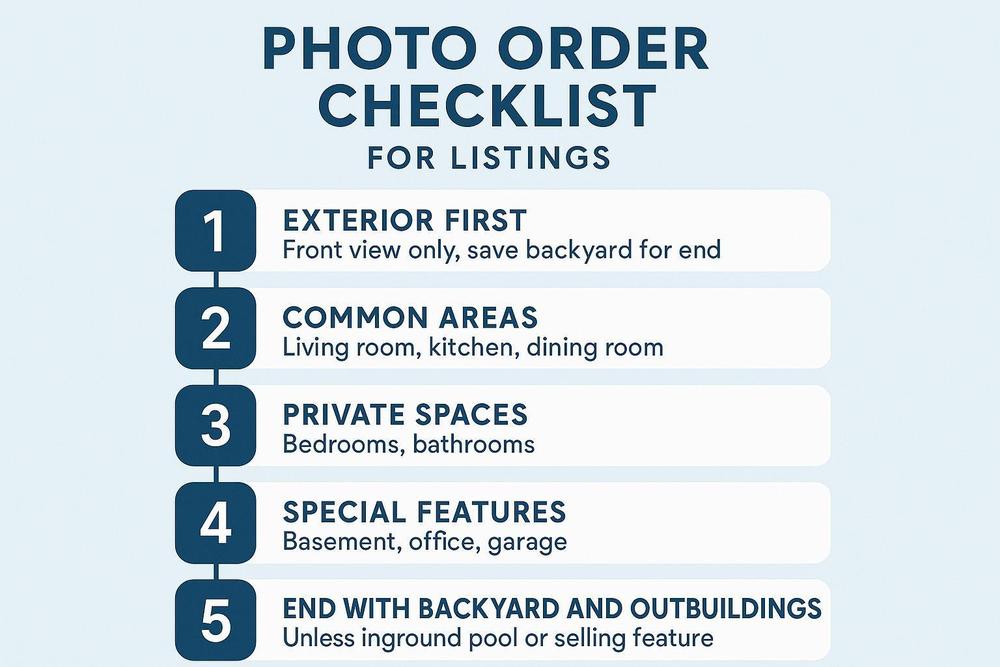
1. Exterior First
Start with the front of the house. This is the thumbnail buyers see. It sets the tone for the whole listing.
- Front exterior (hero shot) only—save the backyard for the end
2. Common Areas Next
After the front exterior, go inside to the main living spaces.
- Living room
- Kitchen
- Dining room
- Family room or den (if the home has one)
3. Private Spaces After
Save bedrooms and bathrooms for the middle of the gallery.
- Master bedroom
- Other bedrooms
- Main bathroom
- Other bathrooms
4. Special Features and Details
Include extras that add value.
- Finished basement
- Home office
- Garage
- Storage or closets (only if they’re a selling point)
5. End with Backyard and Outbuildings
We recommend ending with the backyard and outbuildings. Most buyers want to see the interior first. Save outdoor spaces for the end—unless the backyard contains a selling feature like an inground pool, a standout deck, or a guest house. In that case, show it earlier to highlight the feature.
What If the Home Has an Unusual Layout?
Some homes have odd floor plans. A split-level might feel different from a ranch. The rule stays the same: follow the flow.
- Walk through the home before you shoot
- Note the path that feels most natural
- Shoot in that order
- Avoid jumping from room to room with no logic
When in doubt, common areas first. Then bedrooms and baths. End with backyard and outbuildings—unless they have a selling feature like a pool.
Mistakes to Avoid
- Bathroom first – Don’t lead with a toilet. It turns buyers off.
- Random order – Jumping from kitchen to bedroom to garage feels chaotic.
- Burying the best room – If the kitchen is stunning, put it early. Don’t hide it at photo 25.
- Too many exterior shots in a row – One strong front exterior shot, then move inside. Save backyard for the end unless it has a selling feature.
Frequently Asked Questions
What order should real estate photos be in?
Start with the front exterior, then common areas (living room, kitchen, dining room), then bedrooms and bathrooms, then special features. End with the backyard and outbuildings—unless they contain a selling feature like an inground pool.
Should real estate photos start with the exterior?
Yes. The first photo should be a strong exterior shot. It’s the thumbnail buyers see in search results. It decides whether they click.
Why do photographers shoot common areas first?
Common areas are where buyers imagine living. The living room and kitchen sell the home. Showing them first keeps buyers engaged and matches how they would tour in person.
What is the natural flow in real estate photography?
Natural flow means shooting in the order a buyer would walk through the home. Enter at the front, move through living spaces, then bedrooms and baths. The photo order should match this path.
Can I put the kitchen first in my listing photos?
Yes, if the kitchen is the home’s best feature. After the exterior, you can lead with the kitchen. The key is to keep a logical flow—don’t jump to a bedroom, then back to the living room.
How many exterior photos should come first?
One. A strong front shot, then move inside. We recommend ending with the backyard and outbuildings—unless the backyard has a selling feature like an inground pool, in which case show it earlier.
Should real estate photos end with the backyard?
Yes. We recommend ending with the backyard and outbuildings. Most buyers want to see the interior first. The exception: if the backyard has a selling feature like an inground pool, a standout deck, or a guest house, show it earlier to highlight the feature.
Conclusion: Your Next Steps
Photo order matters. Follow the flow of the home. Start with the front exterior and common areas. End with the backyard and outbuildings—unless they have a selling feature. Keep buyers engaged from the first click to the last.
What to do next:
- Review your current listings – Does the photo order follow the natural flow? Or does it jump around?
- Lead with common areas – Put living room, kitchen, and dining room early. Save bedrooms and baths for the middle. End with backyard and outbuildings—unless they have a selling feature.
- Walk through before you shoot – Note the path that feels natural. Shoot in that order.
- Put your best shot first – The exterior thumbnail gets the click. Make it strong.
- Cut weak photos – A logical order helps, but only if every photo adds value.
Follow the flow. Start with the front exterior and common areas. End with the backyard and outbuildings—unless they have a selling feature. Have all media ready from day 1 so order matters from the first click. Your listings will feel more inviting and keep buyers scrolling longer.