Quick Answer:
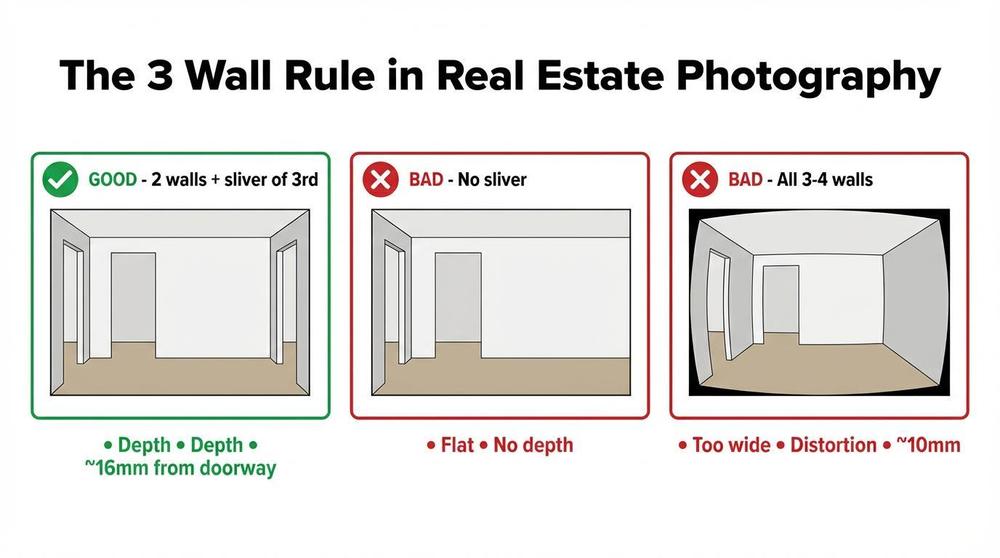
The 3 wall rule in real estate photography means you should show 2 walls plus a sliver of the 3rd to create depth. Without the sliver, the shot feels flat. If you show all 3 or 4 walls filling the frame, you’re too wide and the room distorts. A sliver is enough.
What Is the 3 Wall Rule?
The 3 wall rule is a composition tip for real estate and interior photography. It tells you how many walls to show in a room photo.
The rule is simple:
- Show 2 walls plus a sliver of the 3rd for depth
- Avoid only 2 walls—no sliver means no depth feel
- Avoid all 3 or 4 walls filling the frame—too wide, causes distortion
Why? A sliver of the third wall gives the viewer a sense of space and flow. Without it, the shot feels flat. With too much wall (all 3 or 4 in frame), the room stretches and distorts.
Why Three Walls Add Depth
Three Walls = Sense of Space
When you capture three walls in one shot, you show how the room connects. You need at least the corner of the third wall—a sliver is enough. If the door is in the corner, the edge of the door jamb at the frame edge can provide that perspective. Buyers see corners and flow. The photo feels real and easy to read.
Two Bad Options to Avoid
No sliver = no depth. The same shot with only 2 walls and no sliver of the 3rd feels flat. Buyers lose the sense of space. Always include at least a sliver of the third wall.
Too wide = distortion. If you show the full of all 3 walls—or even 4 walls—you’re way too wide. The room stretches and warps. Corners look odd. This happens when you go ultra wide (like 10mm) in small rooms.
Benefits of the 3 wall rule:
- Photos have more depth
- Rooms feel real and easy to understand
- Less distortion in small spaces
- Buyers get a better sense of the layout
How to Use the 3 Wall Rule
Step 1: Aim for Three Walls
Position your camera so you see three walls in the frame. You need at least the corner of the third wall—a sliver is enough. If the door is in the corner, the edge of the jamb at the frame edge adds perspective. Stand in a corner or angle into the room. The goal is depth.
Step 2: Avoid Too Much of Three Walls in Small Rooms
In small rooms, don’t fill the frame with too much wall. That stretches the space and adds distortion. The corner of the third wall is enough. Back up or change your angle if needed.
Step 3: Keep Vertical Lines Straight
Use a tripod and level your camera. Straight walls look professional. Tilted walls look sloppy.

Example: Good vs Bad Composition
This bedroom photo shows 2 full walls (left and back) and a sliver of the 3rd wall on the right. That sliver adds depth—the room feels real and easy to read. Without the sliver, it would feel flat. If it showed all 3 or 4 walls filling the frame, it would be too wide and distorted.

When Two Walls Are Okay
- Large rooms – Big spaces can handle more of three walls without bad distortion
- Detail shots – Close-ups of a feature (fireplace, built-in) may only need two walls
- One-point perspective – Centered shots down a hallway or into a room sometimes show less
Use your judgment. In small rooms, three walls usually work better.
Pro Tip: Shoot From the Doorway
Shooting from the doorway often gives you 2 walls and a sliver of the 3rd—exactly what you want. At around 16mm, you get depth without distortion. If you go ultra wide to 10mm, all 3 walls often fill the frame and the room looks stretched. The door jamb at the frame edge adds perspective. You need at least the corner of the third wall; a sliver is enough.
Related Composition Tips
- Keep vertical lines straight – Leaning walls look amateur. Level your camera.
- Use wide-angle wisely – Around 16mm from the doorway gives you 2 walls plus a sliver of the 3rd. Going to 10mm often puts all 3 walls in frame and causes distortion in small rooms.
- Light the space well – Bright, even light makes rooms feel bigger.
- Back up when you can – More distance can reduce distortion compared to standing close with a very wide lens.
Frequently Asked Questions
What is the 3 wall rule in real estate photography?
The 3 wall rule means you should show three walls in a room photo to create depth. You need at least the corner of the third wall. If the door is in the corner, the edge of the jamb can provide perspective. Avoid showing too much of three walls—it causes distortion, especially in small rooms.
Why show three walls?
Three walls give a sense of depth and flow. Buyers see how the space connects. The photo feels more real and easier to read.
What makes a bad real estate room photo?
Two things: (1) Only 2 walls with no sliver of the 3rd—no depth feel. (2) All 3 or 4 walls filling the frame—too wide, distortion.
Does the 3 wall rule apply to all rooms?
It matters most in small rooms where distortion is a problem. Large rooms can sometimes show more of three walls without issues.
How do I get 2 walls plus a sliver of the 3rd?
Shoot from the doorway or a corner. Angle so you see 2 full walls and at least a sliver of the 3rd. If the door is in the corner, the edge of the jamb at the frame edge provides perspective. Around 16mm works well. A tripod helps keep things level.
What causes distortion in real estate photos?
Standing too close with a very wide lens (like 10mm) and showing all 3 walls filling the frame causes distortion. Shooting from the doorway at around 16mm gives you 2 walls plus a sliver of the 3rd—depth without distortion.
Does the third wall need to be full?
No. You need at least the corner of the third wall—a sliver is enough. If the door is in the corner, the edge of the door jamb at the frame edge can provide that perspective.
Conclusion: Your Next Steps
The 3 wall rule helps your photos show depth and avoid distortion in small rooms.
What to do next:
- Review your past photos – Do small rooms show three walls without too much wall in frame?
- Practice on your next shoot – Aim for three walls in each room. Adjust your angle.
- Watch for distortion – In tight spaces, avoid showing too much of three walls. Back up or change your angle.
- Share with your team – If you work with photographers, make sure they know the rule.
Follow the 3 wall rule and your listing photos will have better depth and less distortion.